
I absolutely love making these toasted, salty almonds, they are so easy to make, taste amazing a
Se næste indlæg >


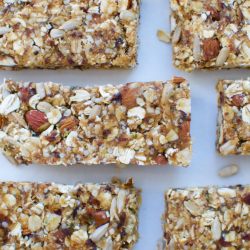
Homemade muesli bars

Muesli bars are one of my absolute favorite snacks to bring with me when I am in a hurry or when I have to eat on the go, but unfortunately the store-bought muesli bars are often full of processed sugar, fat and other nasties. While it is possible to find store-bought muesli bars that are actually organic, unprocessed and healthy, they are usually super expensive and since I am a student with a limited budget I thought it was about time that I tried making my own.
These homemade muesli bars are tasty, super filling and the best part is that you know exactly what is in them – no added nasties! I start uni again next week and these will be perfect to bring with me to snack on between lectures.
I loved how these turned out, but I want to continue to experiment with new recipes and flavor combinations so please share if you have any good tips on what I could use as a binding agent? I do not like nut butters, but I would like to make my next batch without dates so I need to find something new to make the rest of the ingredients to stick together.
Ingredients, yields 10 bars:
1 cup (about 2 1/2 deciliter) pitted dates, packed
1 cup (about 3 1/2 deciliter) rolled oats
1/2 cup (about 1 1/4 deciliter) almonds, chopped
1/2 cup (about 1 1/4 deciliter) sunflower seeds
2 tablespoons coconut oil, melted

Directions:
Start by adding the dates to a food processor and pulse until you get a gooey paste. Add all the ingredients (including the date paste) to a bowl and mix everything well. Make sure to knead the ingredients together until you have a cohesive dough – I just use a spoon to do this. Line a pan, plastic container or whatever you have available with parchment paper or plastic foil and add the dough – make sure you press it in real tight and leave it in the fridge for 30-60 minutes to harden. Now, all there is left to do is to cut it into bars of your desired size (I got 10 bars from this) and they’re ready to eat, enjoy!
Note: Store them in an airtight container in the fridge or freezer, they should keep at least two weeks when stored in the fridge.


Love this!
You say exactly what I always think: these bars have too much sugar and other stuff I don’t want to eat when they’re bought at a supermarket, but the organic ones are so expensive! So you can imagine that I love this post! And I also love the fact that you don’t put them in the oven: this way some raw cacao (like cacao nibs) can be added (and I love cacao nibs haha).
Thank you, I will make this today I think!